
A Quilter’s Guide to Making Clothes
Meet Leila Knoll: garment maker extraordinaire! She’s going to walk us through all the things you need to know if you’re a quilter who is interested in exploring the world of garment sewing. Read on to learn all about it, and if you’re looking for some inspiration, take a look at her gorgeous instagram feed.

ABOUT ME
I am a full-time veterinarian at a non-profit animal sanctuary and a self-taught sewist on my days off. My sewing started in my early teens to make simple alterations on hand-me-down clothes from my sister. I shifted towards quilting when I hit vet school. I loved the feeling of working repetitive (and at times, monotonous) steps until suddenly, this big bloom of color and design came together.
Once I started working in clinical practice, I was more often than not wearing scrubs or poop-covered jeans and boots. I was seeing clothes I wanted but couldn’t afford, and I had no intention of supporting the fast-fashion industry either, so I dove into the world of garment-making and haven’t looked back since. I love sewing to alter, to create, to quilt, to mend, and to learn.
GENERAL TIPS
Garment making can feel more dynamic than piecing a quilt together, so here are my general rules when approaching a garment:
Be mindful
It can seem challenging to execute an instruction only 1-2 times (as opposed to 100+ times depending on the quilt pattern!)
Measure Twice, Cut Once; Read Twice, Sew Once
Easier said than done
Go slowly. It’s easy to overlook a step and end up 5 steps further than where you’re supposed to be in the process.
Always finish your seams
It can be easy to skip this step because you’ve already sewn your pieces together, but take it from someone who notoriously skipped finishing seams when she was first learning - your seams will not keep up over time. The shortcut is not worth the heartbreak of seams ripping from regular use/washing.
THREAD TYPE
Pay attention to your thread color choice. Often, you don’t need to worry as much about the color when piecing together a quilt (your biggest concern is really just light vs. dark thread), but with clothes, the wrong thread color on the hem of your newest make might drive you a little crazy if it’s not somewhat matching in hue.
Picking your thread: I tend to favor polyester thread (e.g., Gütermann) for garments since it tends to be sturdier over time (think: more wash cycles on your worn pieces). It is worth noting that if you plan on dyeing your make after construction, cotton thread (e.g., Coats & Clark) will pick up the dye more easily and evenly.
FABRIC TYPE
There are SO many different types of fabrics out there to choose from, and this section will not do it justice. I tend to lean towards natural fibers and have not done lengthy research on the synthetic options.
I like linen and cotton fabrics that have some drape to them to make them “flow” more easily with movement. They also tend to feed through a standard machine foot nicely compared to the more temperamental synthetic-blend fabrics out there (I’m looking at you, knits).
Whether you choose to work with natural or synthetic fabrics, it is ultimately up to you. Sourcing, the texture, and the feel of the fabric on your body should all be considered when shopping for garment fabrics.
Natural fibers can be divided into plant-based (e.g., cotton, linen) and animal-based (e.g., silk, wool) fabrics
Synthetic fibers include: polyester, rayon, spandex
SEAMS
There are several types of seam finishes in garment-making compared to quilt-making, mostly because seams are almost always hidden in quilts with a nice layer of batting and/or backing. But with clothes you are less likely to include a lining, so finishing your seams appropriately will get your make’s insides looking as good as the outside
Every pattern will include different seam allowances, generally ranging from ¼” to ½”
Keep this in mind to determine how you plan to finish your seams (e.g., it’s much easier to do french seam finishes on seam allowances of ⅜” or larger)
There are several ways to finish your seams, so play around with the different types of finishes and find your favorites -- keep in mind where the seam is (e.g,. inseam vs. side seam vs. shoulder seam) and how thick your fabric is so you can avoid any unnecessary bulkiness when all is done
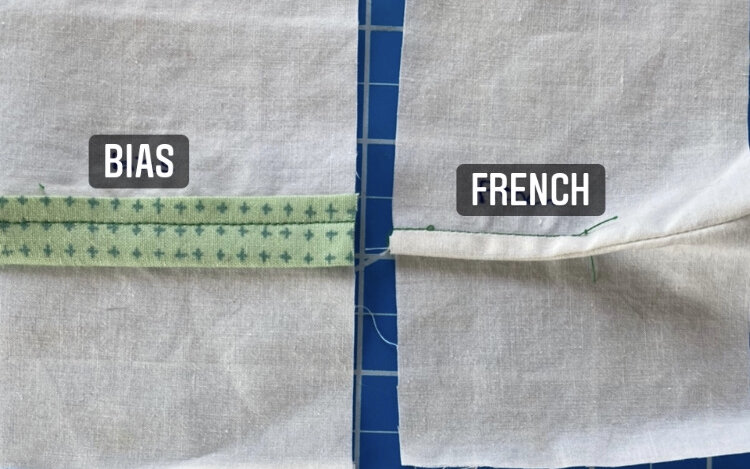
Examples of finishes include: bias bound, french, zig-zag, flat-felled, serger/overlock
There are many great tutorials on different seam finishes on YouTube and personal blogs
STITCHES
In quilting and in garment-making, you really only ever need to use a straight stitch. So, no worries on learning new stitch types unless you’re working on visible mending or embroidery. The only other types of stitches that I have really utilized in garment-making are the zig-zag stitch to quickly finish a seam and backstitching to ensure the end of a piece does not unravel while constructing the make.
GARMENT-SPECIFIC TECHNIQUES
There are a handful of techniques you may not have encountered in quilting that will pop up in garment construction, so here are the most popular ones that I’ve come across so far:
Trimming seams
Depending on the size of your seam allowance, most patterns will instruct you to trim the seams after joining pieces to lessen the bulk of the seam
Curved pieces
If you’ve ventured into curved pieces in quiltmaking, you’ll already be familiar with creating small clips/notches around curved edges to have your seam lay flat when pressed
Facings vs. Linings
Facings are like pseudo-linings, you don’t have to create a full mirror image of the exterior piece as you do with linings and you get to hide your raw edges (a win-win!). Oftentimes they add structure (especially if the pattern calls for adding interfacing to the piece)
Linings are just that - the lining/interior of the garment, often identical to the exterior piece and can be made with other (lighter weight) fabrics to enclose your raw edges

Edgestitching
Used to neaten the edge of a garment by stitching a straight line along the edge of a facing/collar
Often sewn ⅛” from the edge
Basting
Used to keep pleats in place during construction, often done with a long stitch setting on your machine
This stitch is either “hidden” in your finished seam (smaller than the seam allowance) or removed before complete construction of the garment
Interfacing
Material used to add structure and shape to a piece (e.g., collar, sleeve hem, waistband, facing)
Can be made from the same fabric as the garment or a fusible woven/non-woven/knitted material (usually made out of polyester)
“Right”/”Wrong” side of fabric diagrams
It seems very sensible to know what the “right” and “wrong” sides of the fabric are, but it’s hard to keep track in garment construction, so pay attention to the steps and diagrams to avoid seam ripping later
Gathering
To accommodate a larger piece to a smaller piece (e.g. puffed sleeves, skirts, ruffles)
Several techniques exist, but my tried & true method is to increase the stitch length and sew 2-3 lines along the edge of the piece, then gently pull on the bobbin threads at the same time to create gathers and tie knots on either end to keep them in place
Other ways: yarn/floss and zig-zag stitch, high tension/long stitch setting on your machine - I highly recommend looking up YouTube tutorials to see what method works best for you

FAVORITE PATTERNS/MAKES
You have a handful of options when choosing what pattern designer to work with, but the broadest way to categorize them is by independent and traditional makers. Both are lacking in size inclusivity, but I have seen more movement for change and general accountability in the independent patternmaker community. Most independent makers put more effort in describing their steps in construction of a make.
Independent pattern makers
All Well Workshop
A great place to start for novice sewists
Gives you an extensive look into making toiles before diving in
Describes terminology used and step-by-step instructions with images
Favorite make: Studio Pants (unisex option!)

Stitch Witch Patterns
Provides easy-to-follow patterns that you can get through quickly and painlessly
Favorite make: Tudor Blouse with tie wrap hack

Helen’s Closet Patterns
Gives great detailed instructions
Favorite make: Winslow Culottes, also the tie wrap hack version

Others lovely makers to note: Friday Pattern Company, True Bias, Common Stitch, Tessuti Fabrics, Muna and Broad, Edgewater Avenue, Cool Stitches, Paradise Patterns, Sophie Hines, Sarah Kirsten, Wiksten, Closet Core Patterns, Anna Allen Clothing, Deer and Doe Patterns, Papercut Patterns, Criswood Sews, Made My Wardrobe, Sew Liberated, Elizabeth Suzann Studio, Merchant & Mills, Just Patterns
Traditional patternmakers
I have not worked extensively with traditional patterns aside from a Vogue pattern, but I was not impressed with the instructions (they lacked detail and at times, direction).
e.g., Simplicity, Butterick, Burda Style, Vogue Patterns, McCall Pattern Company
A few of my recent makes:

From left to right upper: Papercut Patterns Axis Dress, Just Patterns Helena Wrap Dress, Stitch Witch Patterns Bathurst Top
From left to right lower: Closet Core Charlie Caftan Dress, Vogue #1735 dress with jumpsuit hack, Common Stitch Wattlebird Cami & Bellbird Shorts
GETTING STARTED
Don’t invest in a serger (yet), you can get by just fine with different types of seam finishes while you’re still getting the hang of things and decide if another machine is worth investing in down the road
Don’t get discouraged with knits - they can be very difficult to work with, so sew slowly and consider a walking foot to keep the layers from stretching unequally.
Don’t beat yourself up if your make isn’t wearable! It is not the end of the world, and it happens to everyone (even advanced sewists). Consider it as a lesson learned and keep it in mind when working on your next make.
The Instagram sewing community is a great resource - look up hashtags of the pattern you are considering and you will very likely find others posting about their thoughts and process on the make. Most profiles include the sewist’s body measurements to help give you an idea of what size works on what body (this is, of course, a very loose way to gauge how a piece will fit on you since all bodies are different in their own way :))
Toiles are a sample garment, generally made from an inexpensive fabric (e.g., muslin, old bedsheets) to see if the pattern size and design will fit well on your body. Toiles are a prudent idea, but not a requirement. It can be difficult to get into the mindset of toile-making, especially if you’re coming from a quilting background; it feels mundane and time-wasting. Ultimately if you are looking for a make that fits you just right, toiles are the way to go.
GETTING CREATIVE
Once you get the hang of garment sewing and want to get a bit more adventurous, there is the wonderful world of HACKS. Some patterns will include direction on how to alter a make with certain features (e.g., adding different sleeves, changing a skirt of a dress into pants to make a jumpsuit). Other times, you can let your creative juices flow and make up your own hacks to make the perfect custom piece for you.
