How To Scrapify Any Quilt Pattern
Hey there! It’s Heather Heck from Heck Yes Sew Co! I’m a quilter and pattern designer based near Eugene, Oregon and I’ve recently become much more intentional about trying to use fabric from my stash, rather than buying new fabric for each project. I especially have found a lot of joy in digging through my stash of scraps, finding fabric that I used in a beloved past project, and taking a little trip down memory lane.
As quilters and sewists, it’s common to accumulate lots of scraps from our projects. I’m in the “save every single scrap no matter how small or oddly shaped it is” camp…and I *may* collect those tiny scraps in a jar, especially the scraps from fabric I love; some fabric is just extra special and hard to part with!

One of my favorite ways to use up those tiny little scrap pieces is to sew them all together into a new “scrapified” fabric that I can then use in any quilt pattern. The technique is pretty similar to improv piecing, but it’s done in a slightly more organized fashion with an end goal in mind. Read on for all of my tips and tricks on how to do this yourself!
Find Your Inspiration
The first step is to find your inspiration! I recently decided I wanted to change up the decor in our nursery. I knew I wanted the colors to be themed around one of my favorite quilts and that I wanted to make a few small projects to display on the wall in the same colorway. Here was my color inspiration.

Pick Your Project and Pattern
Next, decide on the pattern you want to make. My favorite classic quilt block is a sawtooth star, so it was an easy place to start as one of the small projects to make and it’s what I’ll be showing you how to make in this tutorial!

Gather Your Supplies
What you’ll need:
Iron
Pressing mat or ironing board
Marking pen or hera marker
Fabric scissors or rotary cutter, cutting mat, and ruler
Lots of scrap fabric of varying sizes in your planned colorway
Sewing machine
Optional:
Muslin fabric, printer paper, or foundation paper piecing (FPP) paper
Starch
Tailor’s clapper

Scrap Fabric vs Scrapified Fabric
Just a little clarification before we dive in: since we’re using scrap fabric to make more scrappy fabric, it can get confusing as to what scrap fabric I’m referring to; from here on out I’ll refer to all the little scrap fabric pieces from your stash as “scrap fabric” and the resulting fabric when all the scrap pieces are sewn together as “scrapified fabric.”
Scrap fabric = scrap pieces from your stash.
Scrapified fabric = the resulting fabric when all of your scrap pieces are sewn together.
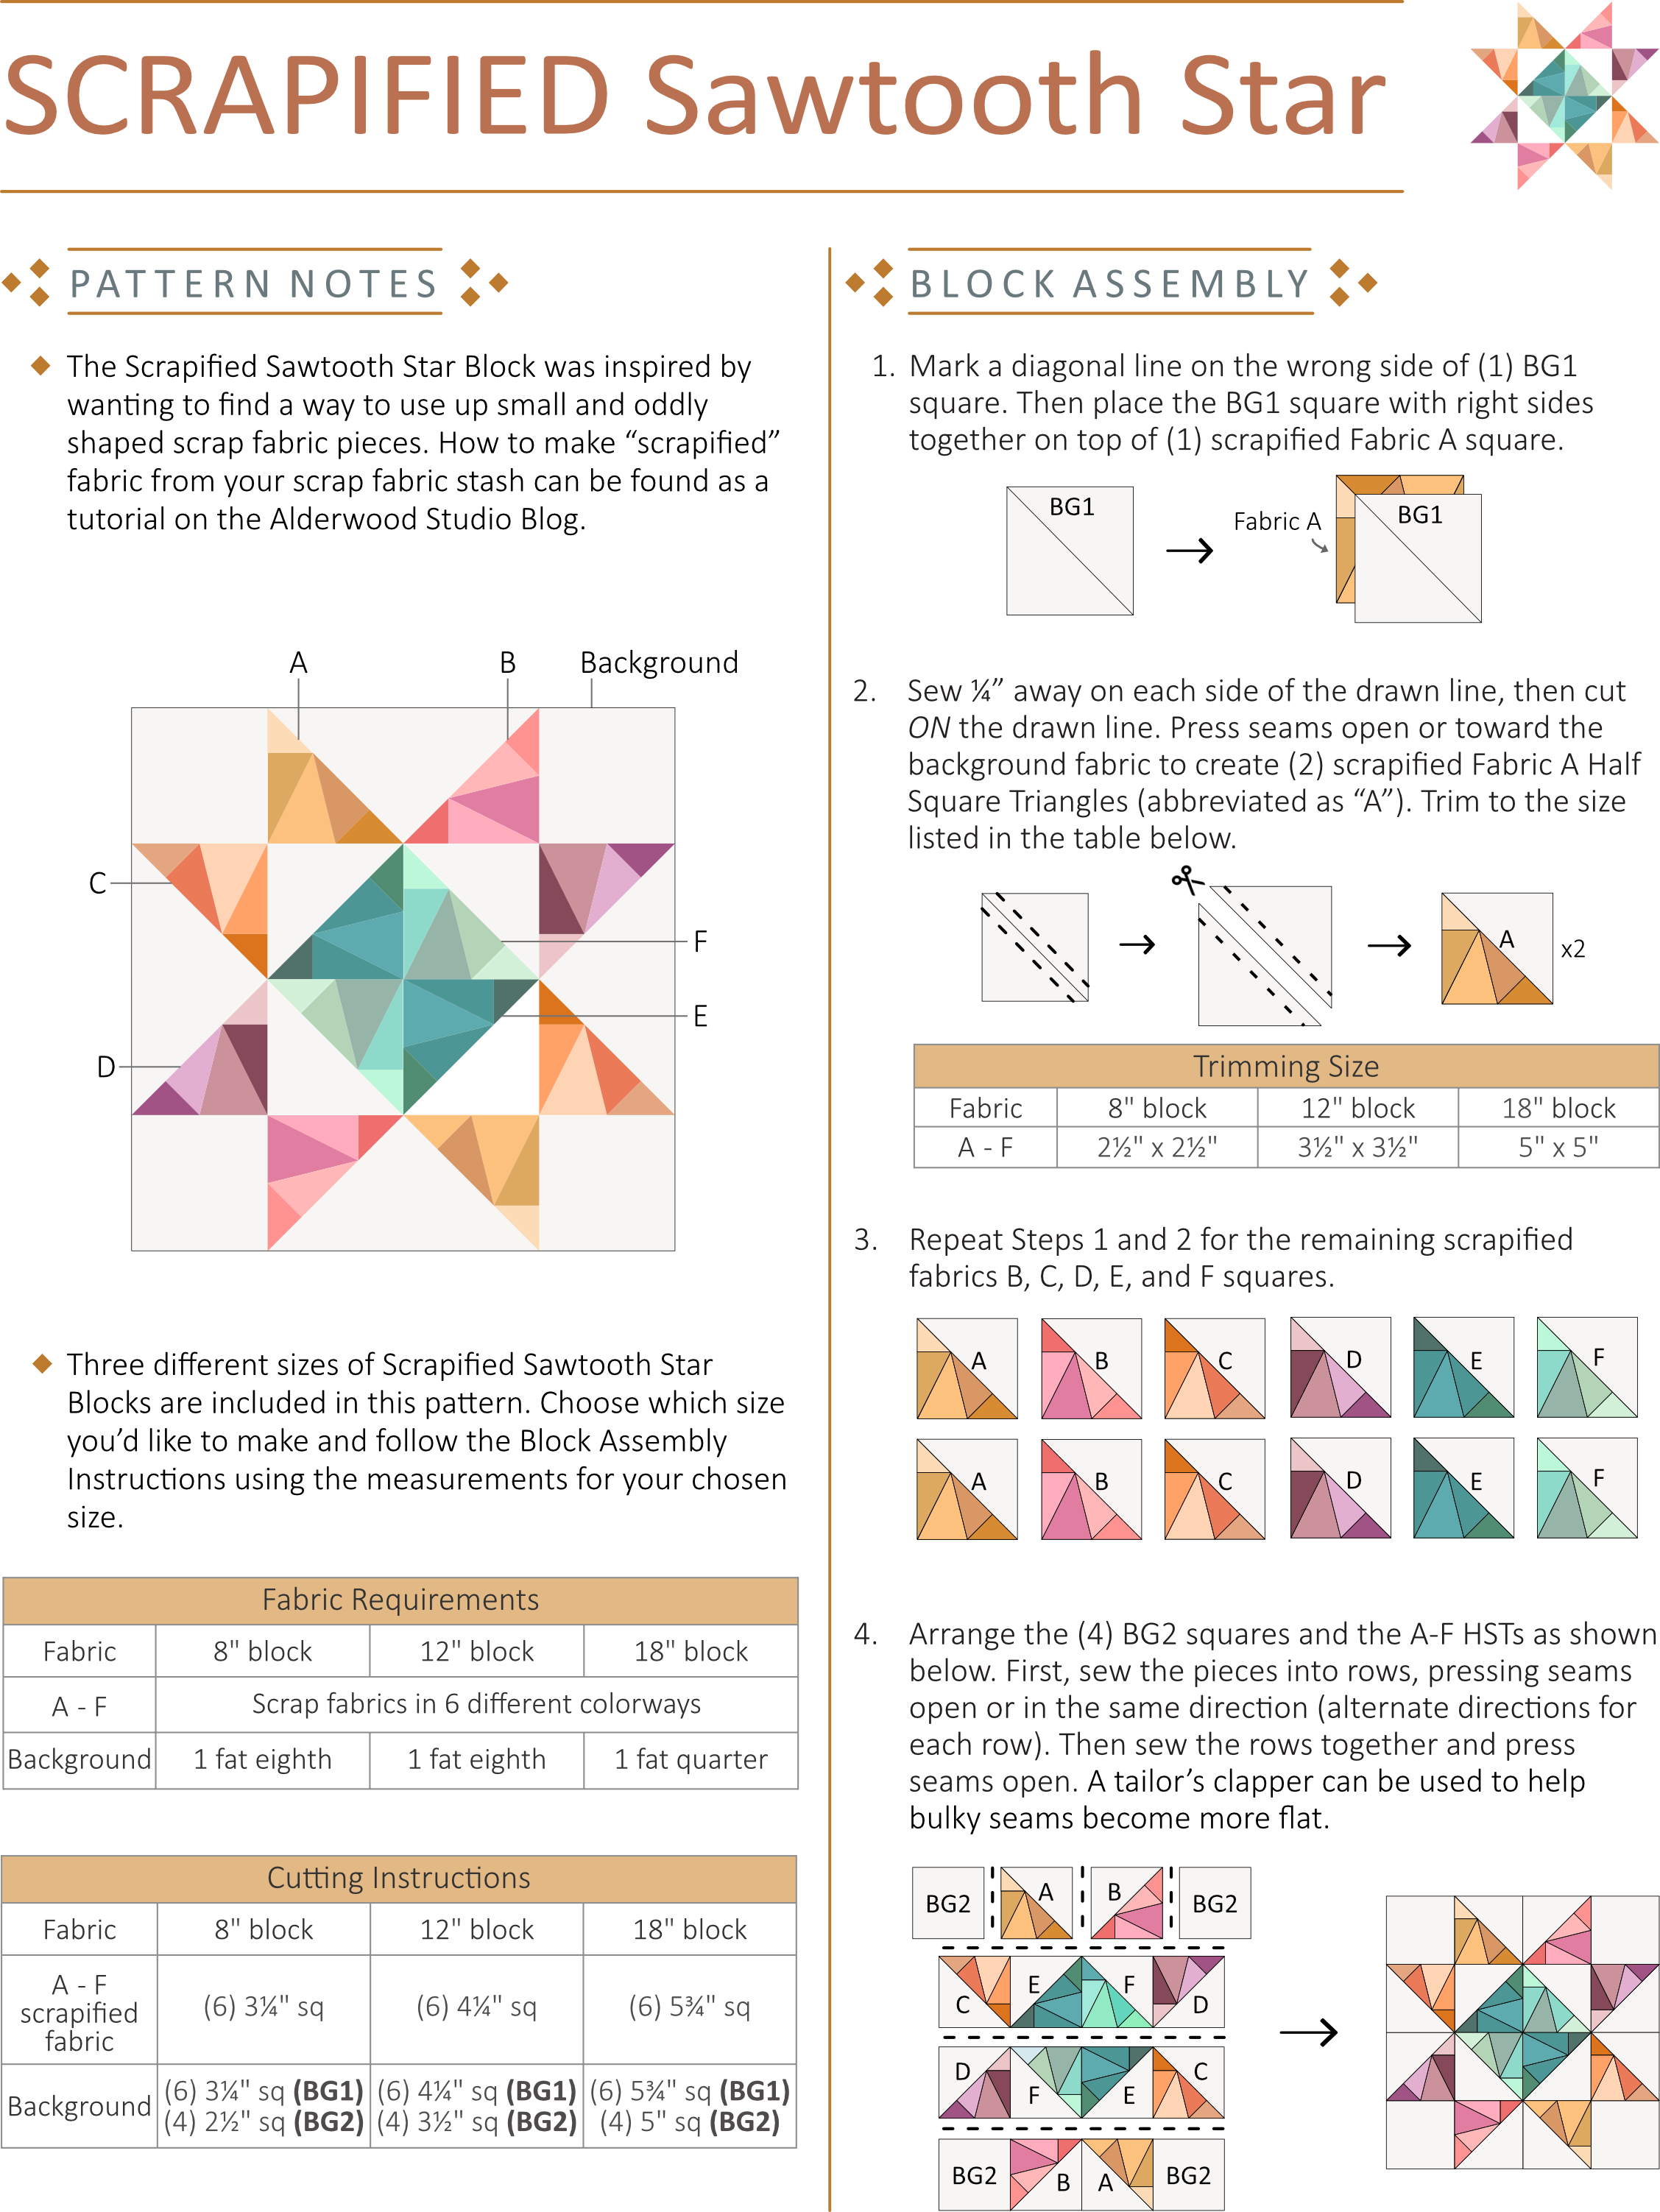
Scrapified Sawtooth Star Block
This tutorial outlines how to make a scrapified sawtooth star block. Below are the fabric requirements and cutting instructions and the full pattern can be found at the end of this tutorial. You can make this block and then use the same techniques for creating scrapified fabric for any quilt pattern. The possibilities really are endless!
Three different sizes of Scrapified Sawtooth Star Blocks are included in the pattern. Choose which size you’d like to make and refer to the fabric requirements and cutting instructions for your chosen size.

Let's Get Scrappy!
After you’ve decided on a project and gathered your supplies, you’re ready to get started! I found that I gravitate toward 3 different methods for sewing my scraps together to create new scrapified fabric. I’ll explain each method in detail and their corresponding pros and cons. Each method is also summarized in the table below. I tend to switch up what method I'm using depending on the project, and sometimes I use a combination of all three for the same project. There's really no wrong way to sew your scraps together! Experiment to see which method works best for you!

Methods 1 and 2 - Using a Base: Paper or Muslin Fabric
Methods 1 and 2 use a base to help stabilize the scrappy fabric. The base also serves as a guide of sorts to help you plan out your scrappy fabric placement and know exactly how much area you need to cover with scraps. One method uses paper and one method uses muslin (or any thin fabric). For the paper method, you can use printer paper or foundation paper piecing (FPP) paper. Just as a note, the photos for the corresponding steps will show a mix of using paper and muslin.
The first step is to cut out all of the pieces that your pattern requires on paper or muslin. For the scrapified sawtooth star block, you will cut out 1 square each of either paper or muslin for Fabrics A, B, C, D, E, and F. For example, if you are making a 12" sawtooth star block and using the paper method, then you would cut out six 4¼" squares from paper.
TIP: For this tutorial the background fabric is solid, but if you wanted to scrapify your background fabric too, then you would also cut out an additional six 4¼" paper squares and four 3½" paper squares. Also, if you’re making a pattern other than the Scrapified Sawtooth Star Block, then don’t forget that your paper/muslin pieces should include a ¼" seam allowance (the measurements for the Scrapified Sawtooth Star Block already include a ¼" seam allowance).

2. Next, place one piece of scrap fabric wrong side down onto your paper/muslin, then place another piece of scrap fabric right sides together on top of the first piece of scrap fabric. Sew the scrap pieces together and onto the paper/muslin ¼" away from the edge of the scrap fabric. You can start in the middle and work your way out toward the edges or you can start on one side and work your way toward the other side. Open up the fabrics, like you would open a half square triangle, and press toward the top piece.
TIP: I find it easiest to work from the center outward if I’m making a square block and from edge to edge if I’m making a longer rectangular strip.

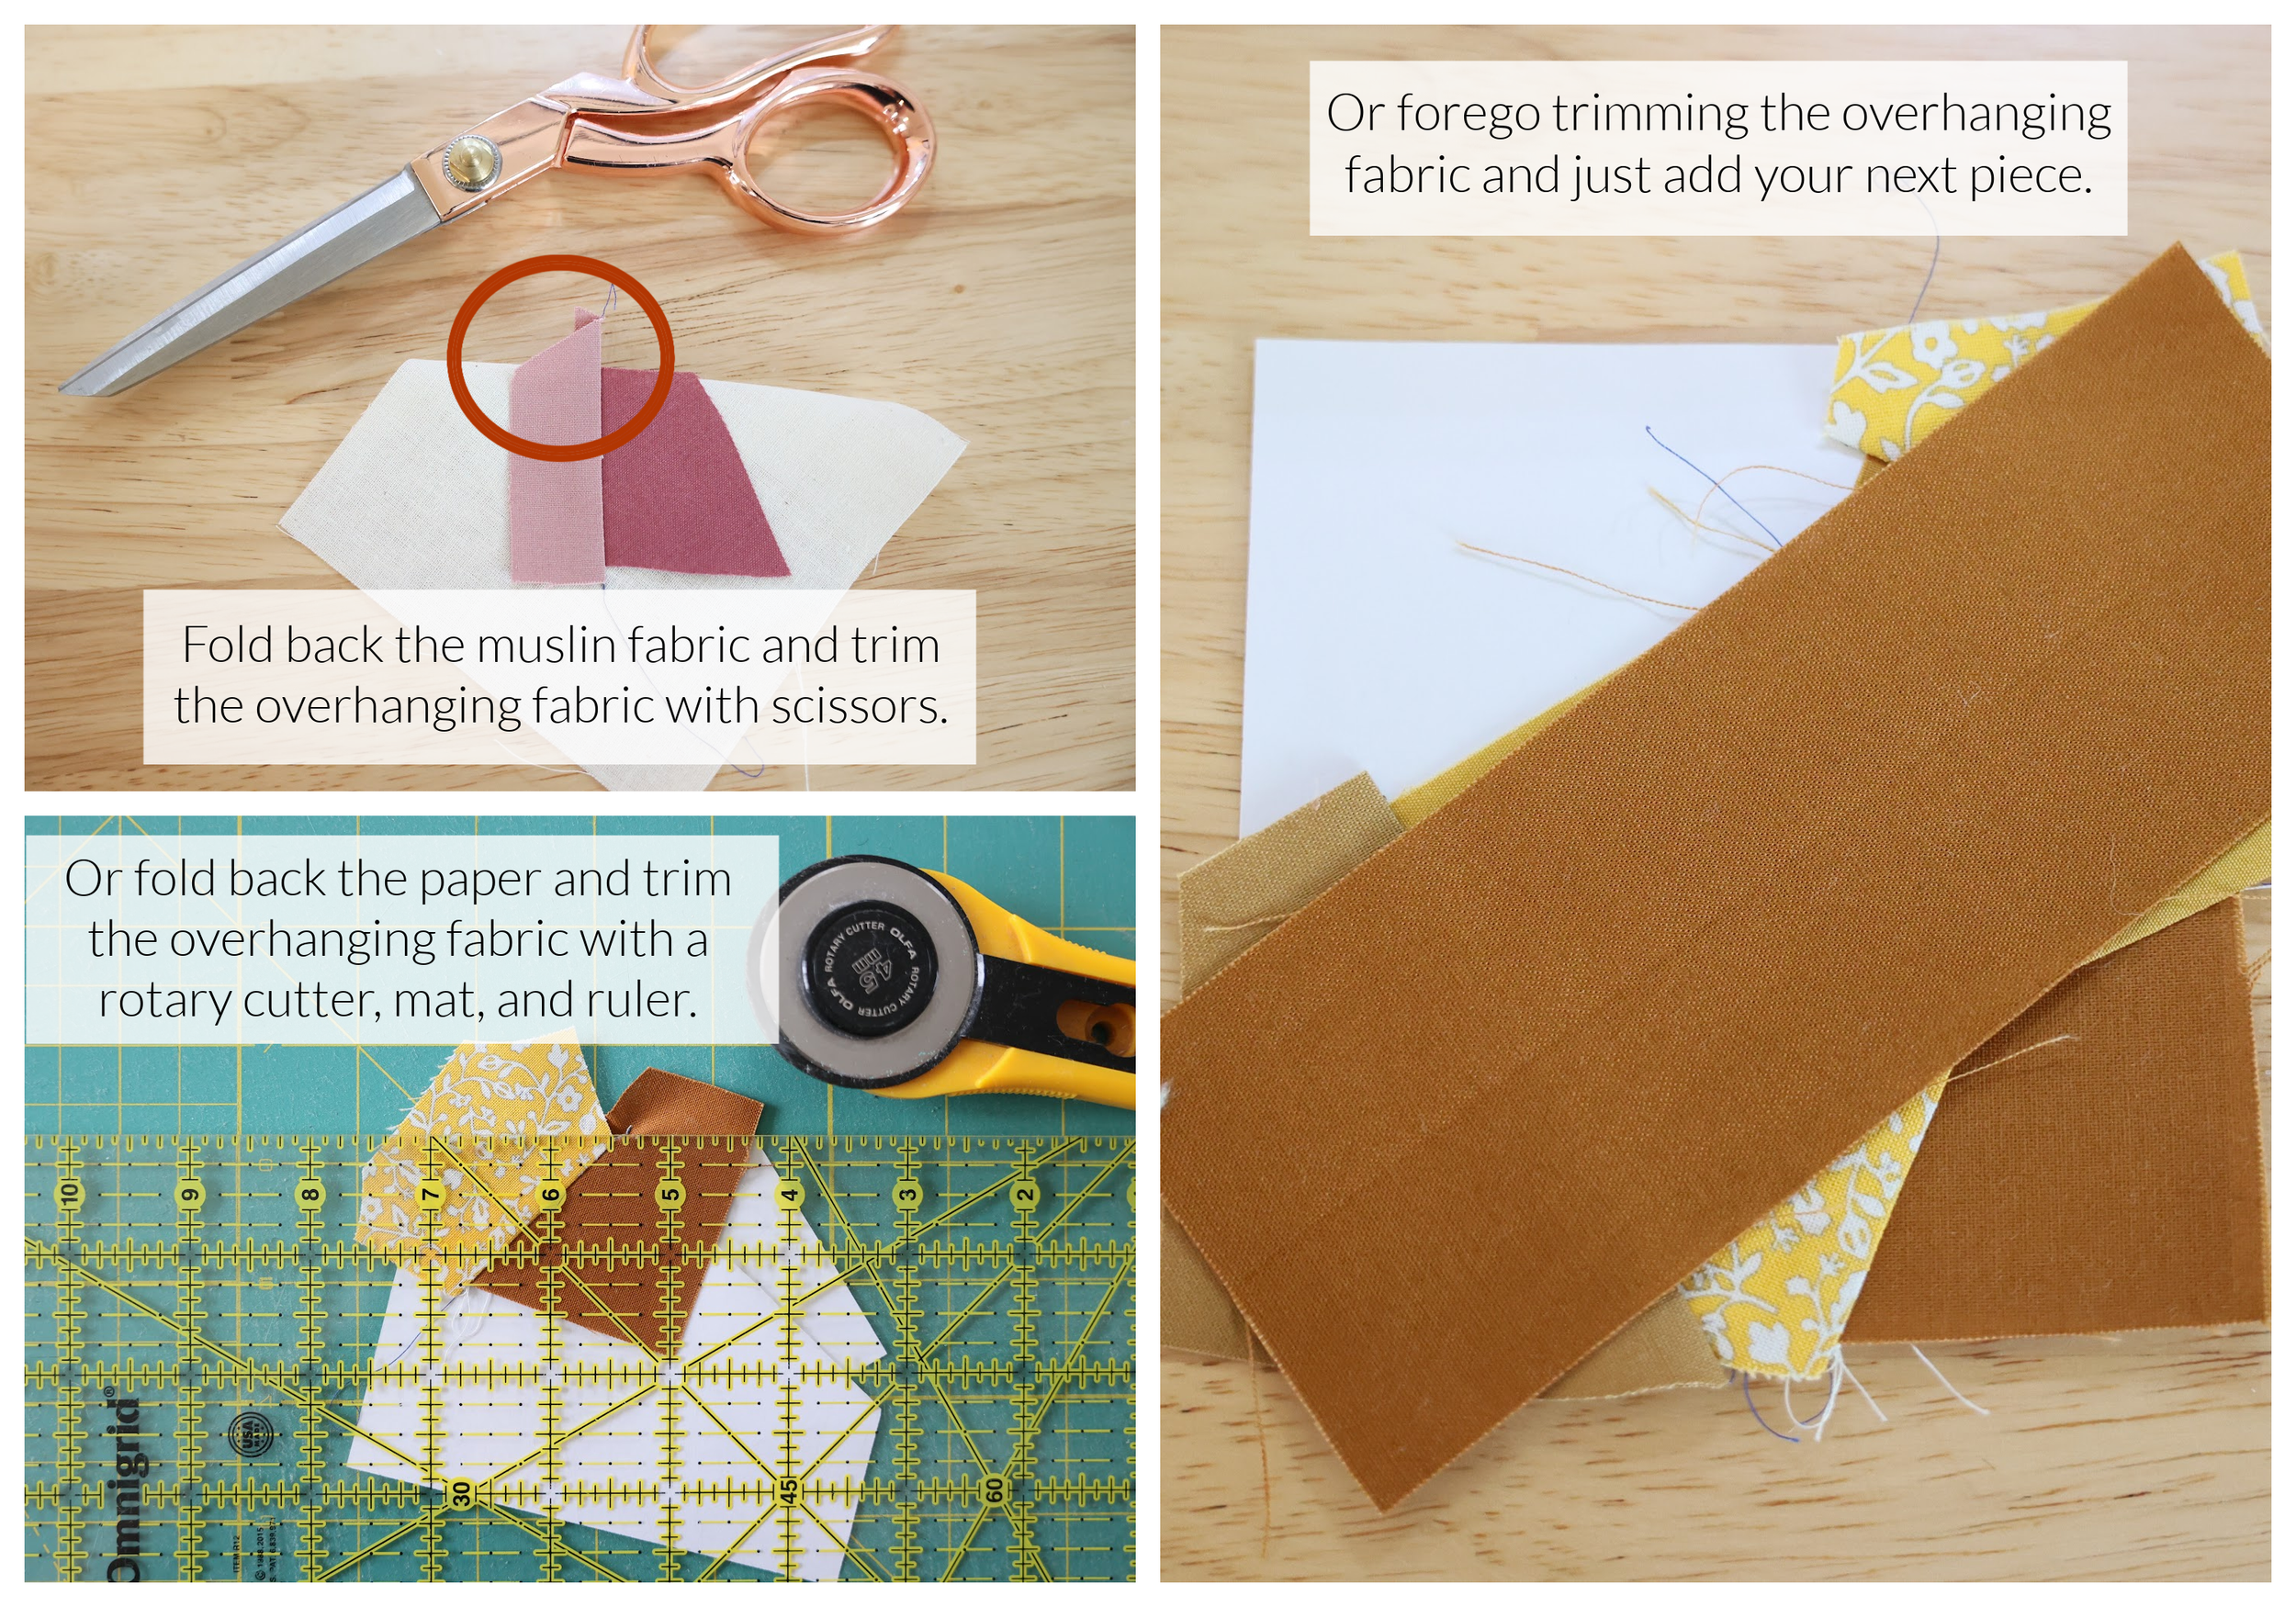
3. Next, you need to create a straight edge to attach your next piece of fabric. You can either fold the paper/muslin under and use fabric scissors to trim the overhanging fabric or a rotary cutter, cutting mat, and ruler to create a straight edge.
TIP: I like using fabric scissors if my pieces aren’t too large because I find it’s quicker. Once my pieces get big, then I switch to using a rotary cutter, cutting mat, and ruler.
Alternatively, you can forego creating a straight edge and just add your next piece of fabric.
TIP: This is my preferred way to do it because I find it to be quicker. One possible downside is that your seams can be bulkier since you’re not trimming the excess fabric; however, I haven’t found them to be so bulky that it has discouraged me from continuing to do it this way.
4. Next, sew another piece of scrap fabric right sides together to the straight edge you just created using a ¼" seam allowance and press toward the piece you just added.

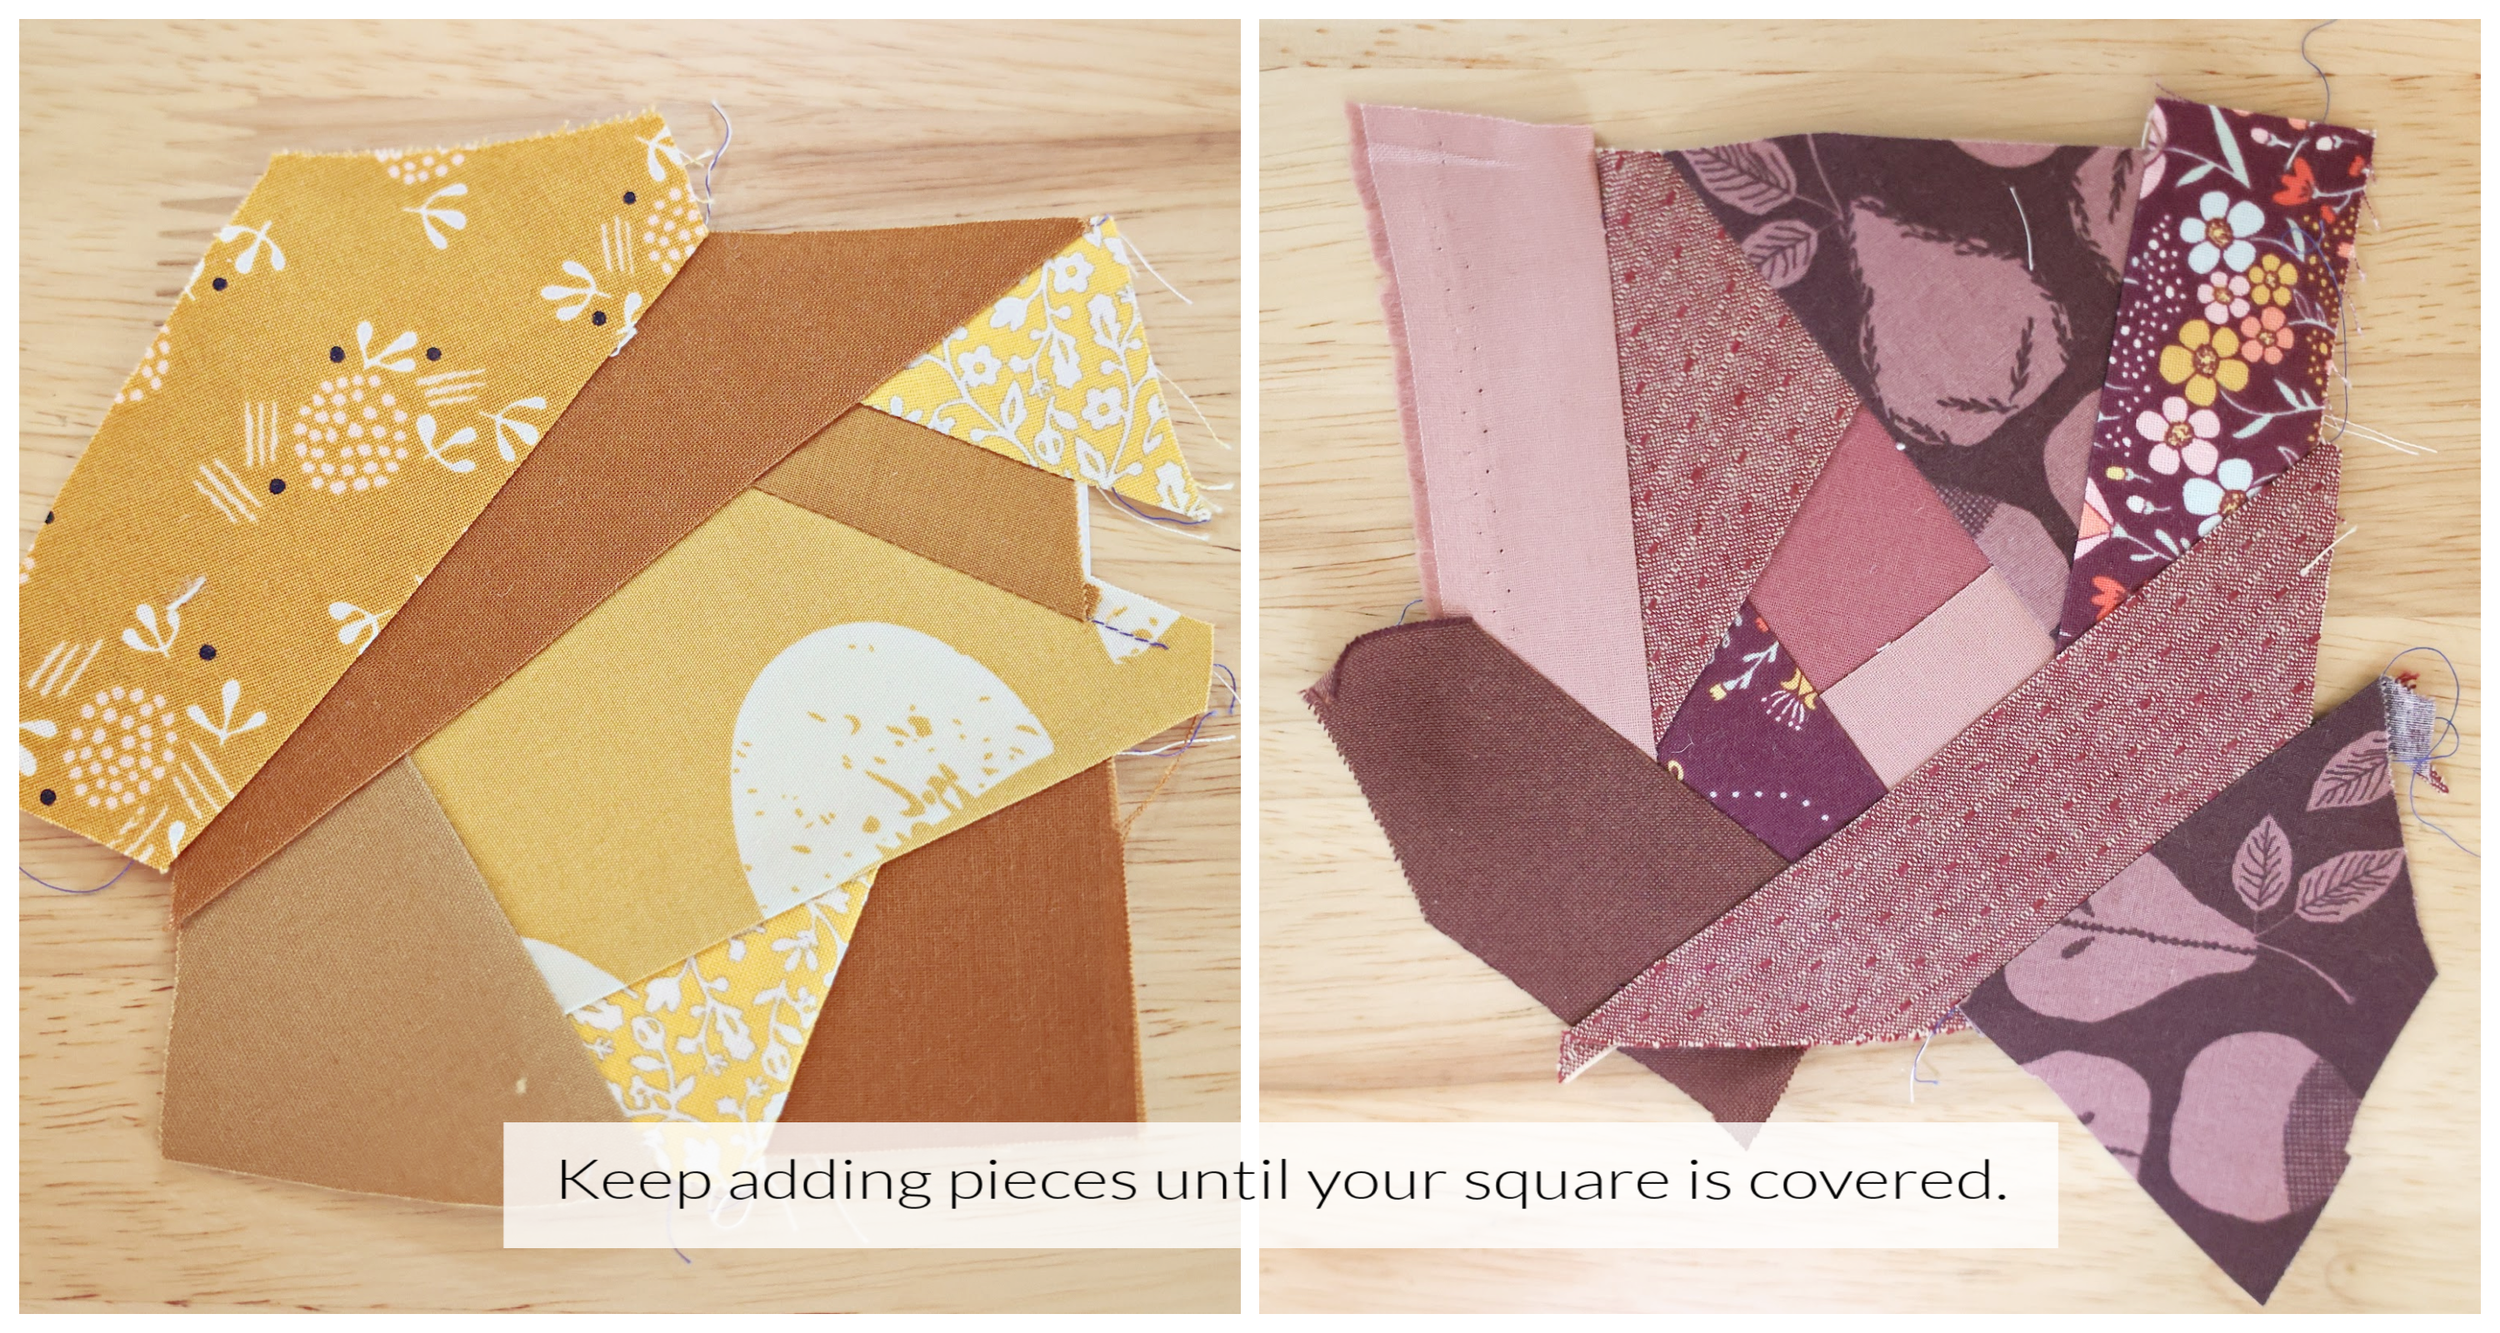
5. Keep adding scrap fabric pieces until your paper/muslin is completely covered with scrap fabric.
6. There will be excess fabric extending beyond the paper/muslin that will need to be trimmed. Flip the block over so that the paper/muslin is facing up. Trim to the size needed for the Scrapified Sawtooth Star Block you are making. For example, if you’re making a 12" block then trim to 4¼" square. You can use the paper/muslin as a guide as they should be the size you are needing; however, I do recommend using a rotary cutter, mat, and ruler for this step so that you can be sure that your square is accurately sized.
TIP: I found that when using muslin as a base, it had a tendency to “shrink” slightly. For example, what started out as a 4¼” muslin square would end up being a 4⅛” muslin square after all the scrap fabric pieces had been sewn to it. To account for this you can either cut your muslin fabric slightly larger than needed to ensure that your ending square won’t be too small or you can make sure that your scrap fabric extends approx ⅛” beyond the muslin square then trim to the correct size. I didn’t find this to be an issue when using paper as a base.

7. Repeat the above steps until all of your paper/muslin pieces are covered with scrap fabric and trimmed. For the Scrapified Sawtooth Star Block, this would be all of the Fabric A, B, C, D, E, and F squares. If you used paper as a base, you can remove the paper from the back of your block at this point.

Now all of your pattern pieces are scrapified! Read on for how to make scrapified fabric without using paper/muslin as a base if you’d like to try out a different method. If you want to jump ahead, assembly instructions for the Scrapified Sawtooth Star Block can be found after the “Tips and Special Considerations” section or in the full pattern at the end of the tutorial.
Method 3 - Using No Base
This method is essentially the same as Methods 1 and 2 except that it involves sewing all your scrap fabric pieces together without the use of a stabilizing base. I find this method to be the quickest since there are no preparation steps; you can just start sewing right away! The drawback is that this method sometimes (but not always) results in your scrapified fabric being slightly stretchy since there’s nothing to stabilize the bias edges of your scrap fabric. This issue becomes more pronounced as the scrap pieces get bigger. Starching your fabrics can help combat the tendency to stretch.
There are a few different ways to approach this method. Say a hypothetical pattern calls for four 4" squares. The first option is to sew all of your scrap pieces together into one large scrapified fabric piece 16" x 16", then cut it down into four individual 4" squares. The second option would be to make four 4” squares individually. If I need larger pieces, I tend to make each piece individually. If I need lots of smaller pieces, then I tend to make a bigger piece of scrapified fabric and cut out the smaller pieces I need. For this tutorial, we’ll be making each square individually.
The first step is to determine the desired size of your scrapified fabric. For the Scrapified Sawtooth Star Block, you will scrapify one square each in your chosen size block for Fabrics A, B, C, D, E, and F. For example, if you are making a 12" scrapified sawtooth star block, then you would make six scrapified fabric squares that measure slightly larger than 4¼" in six different colorways.
TIP: For this tutorial the background fabric is solid, but if you wanted to scrapify your background fabric too, then you would also make an additional six 4¼" squares and four 3½" squares in whatever colorway you’d like your background to be.
2. Next, place two pieces of scrap fabric right sides together and sew ¼" seam allowance along one edge. Fold back the top piece of fabric and press the seams toward the top piece.

3. Next, you need to create a straight edge to attach your next piece of fabric. Use either fabric scissors or a rotary cutter, cutting mat, and ruler to create a straight edge.
TIP: I like using fabric scissors if my pieces aren’t too large because I find it’s quicker. Once my pieces get big, then I switch to using a rotary cutter, cutting mat, and ruler.
Alternatively, you can forego creating a straight edge and just add your next piece of fabric.
TIP: This is my preferred way to do it because I find it to be quicker. One possible downside is that your seams can be bulkier since you’re not trimming the excess fabric; however, I haven’t found them to be so bulky that it has discouraged me from continuing to do it this way.
Then sew another piece of scrap fabric right sides together to the straight edge you just created using a ¼” seam allowance and press toward the piece you just added.

4. Repeat Step 3 until the scrapified fabric measures slightly larger than the size you need then trim to your needed size.
TIP: I have my ruler handy so I can measure as I go.

5. Repeat the above steps until all of your needed pieces have been scrapified and trimmed. For the sawtooth star block, this would be all of the Fabric A, B, C, D, E, and F squares.

Now all of your pattern pieces are scrapified! Read on for some tips. If you want to jump ahead, assembly instructions for the Scrapified Sawtooth Star Block can be found after the “Tips and Special Considerations” section or in the full pattern at the end of the tutorial.
Tips and Special Considerations:
You can use a smaller seam allowance when sewing your scrap fabric together if your final project won’t be heavily used. For example, if you’re making a wall hanging, you can use a 1/8” seam allowance if you prefer. If your project is a quilt that will be washed multiple times, it’s best to stick with a ¼” seam allowance.
If you find that you have exceptionally bulky seams when you sew your completed pieces together, it may be helpful to use a tailor’s clapper to encourage them to be more flat.
Consider scale when you’re planning your project. If you have large blocks, you may consider using larger scrap fabric pieces to better match the scale of your large blocks (and it would be quicker). Similarly, if your blocks are smaller, you may want to use smaller scrap fabric pieces to match the scale of the small blocks and so that more scrap fabric pieces can be included in the smaller blocks.
The Scrapified Sawtooth Star Block uses scrapified fabric for the “colored” pieces and unscrapified fabric for the background pieces. Feel free to experiment and use all scrapified fabric for the background pieces too!
Scrapified Sawtooth Star Block Assembly Instructions
If you haven’t already cut out your background pieces, take the time to do this now. Then gather your background pieces and your scrapified fabrics A through F.

Now we’re ready to assemble everything!
First, mark a diagonal line on the wrong side of (1) BG1 square. Then place the BG1 square with right sides together on top of (1) scrapified fabric A square.
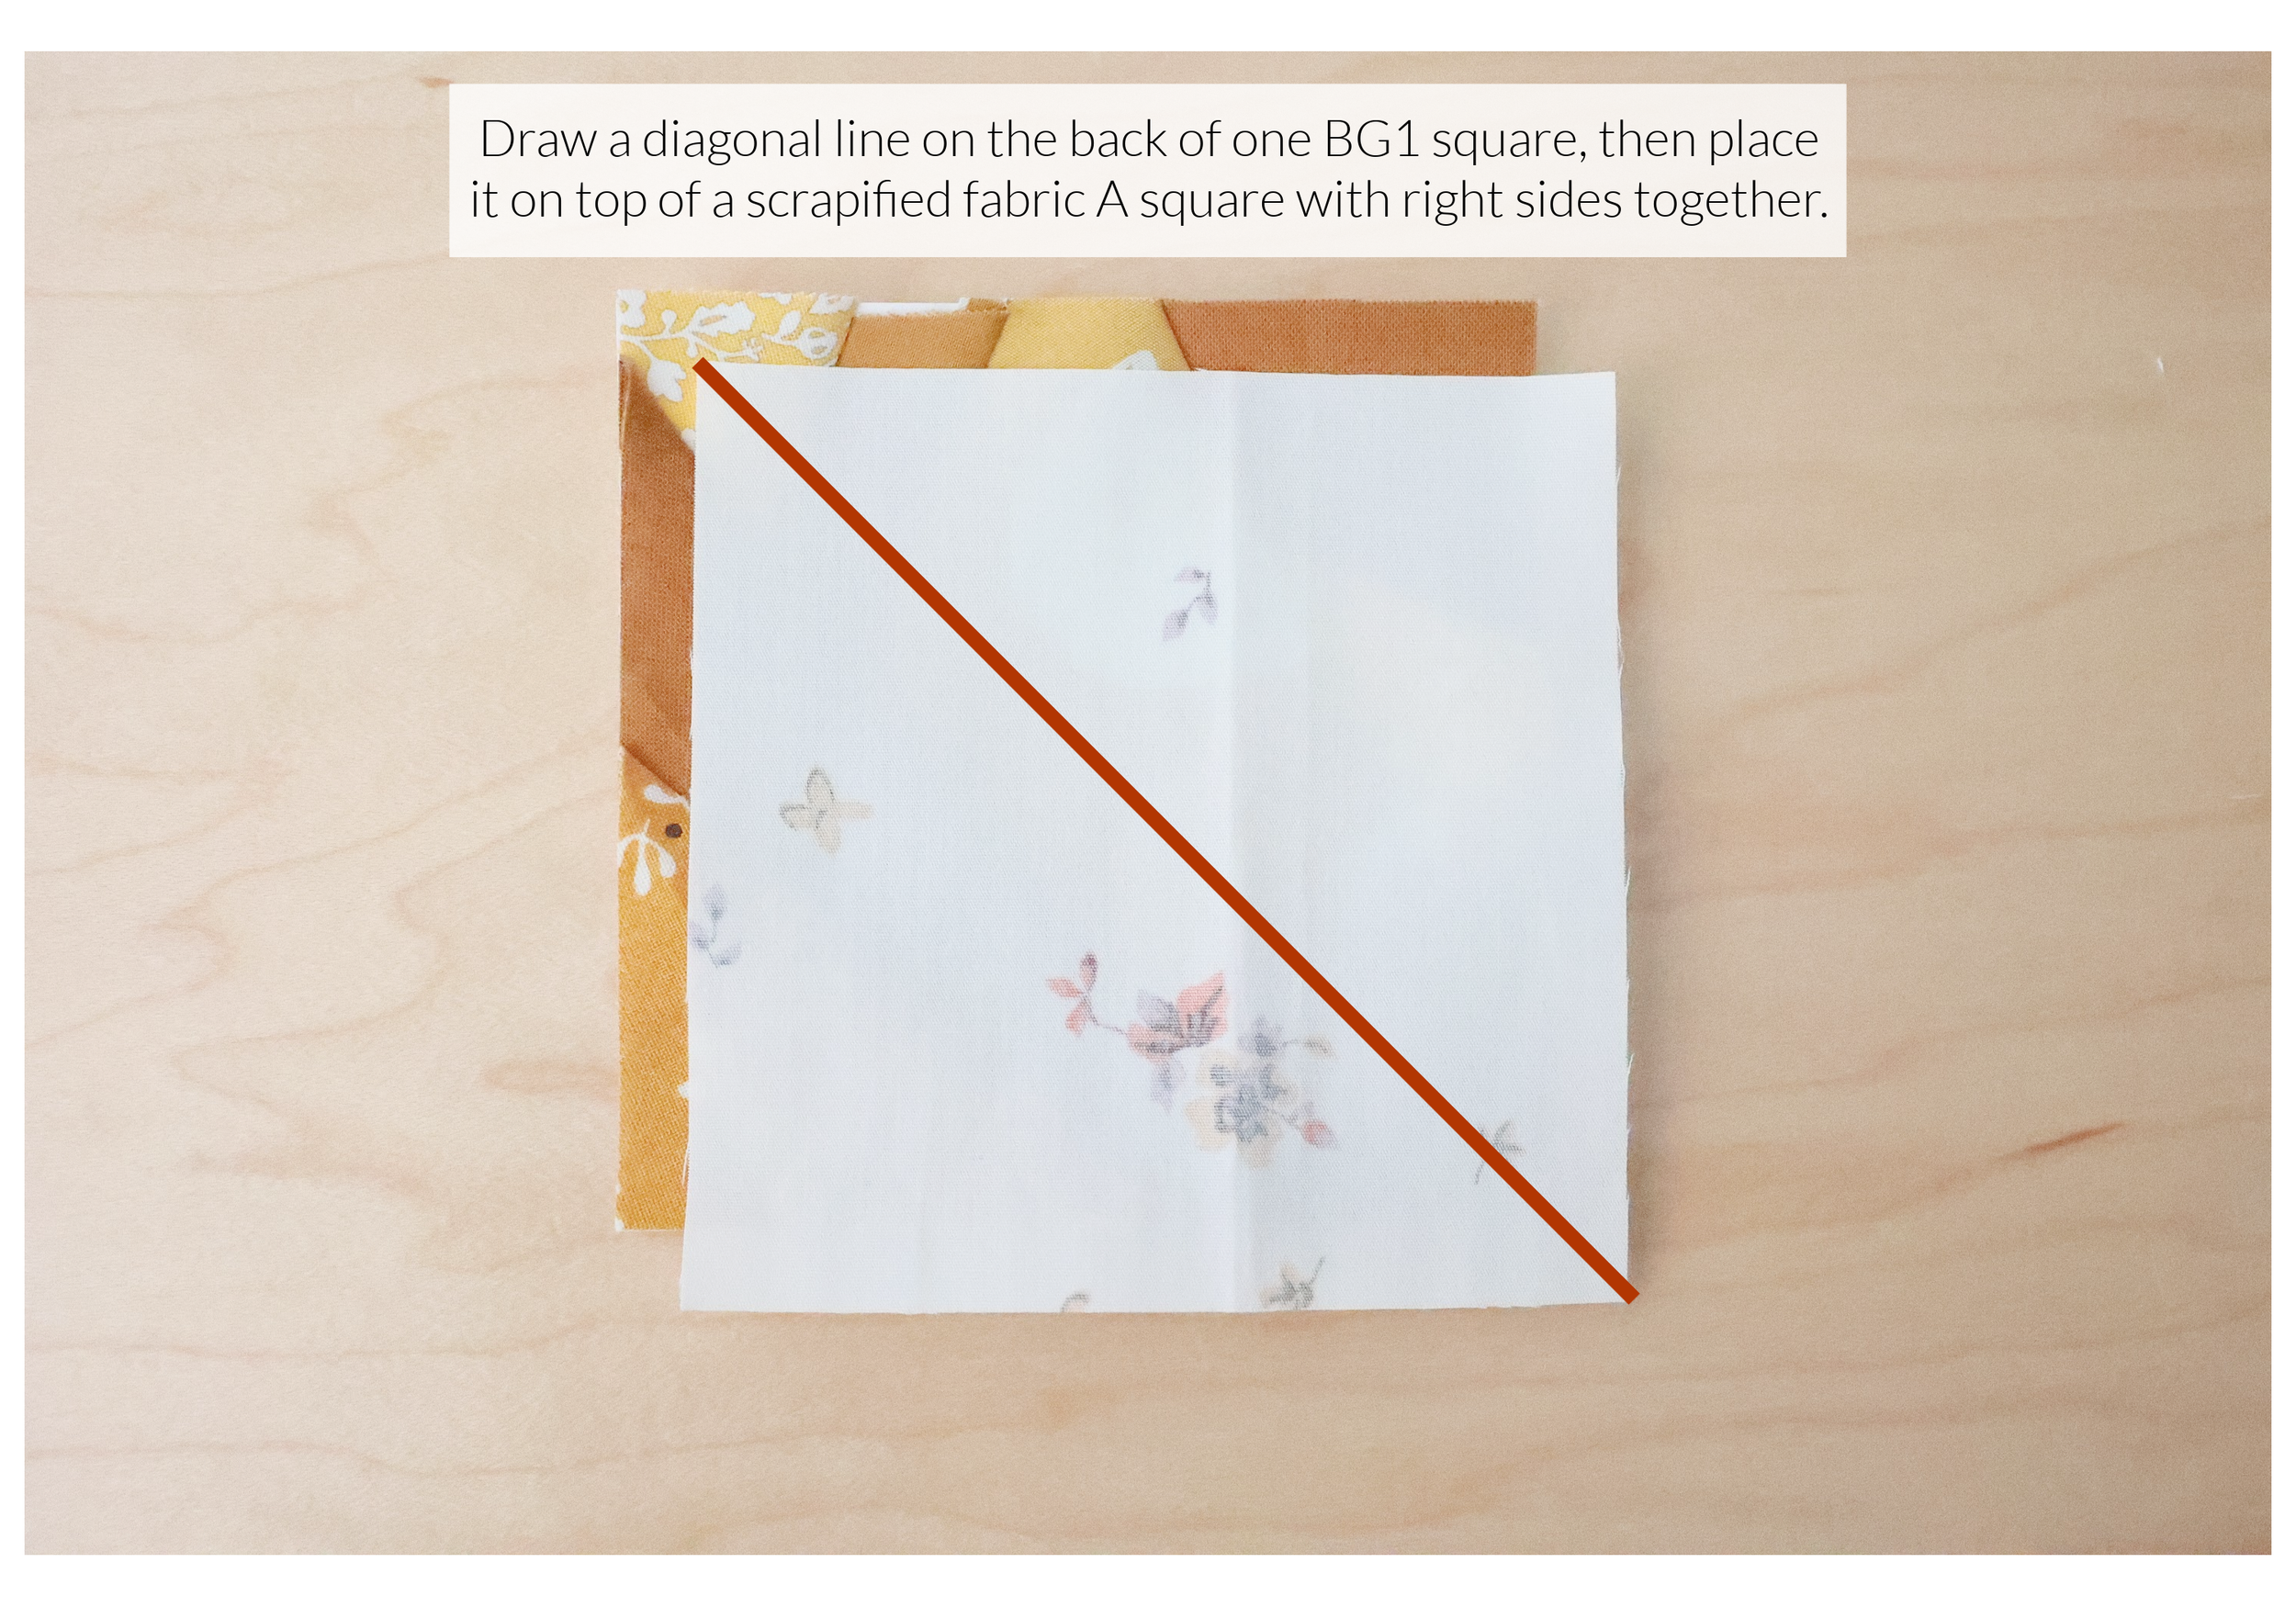
2. Sew ¼” away on each side of the drawn line, then cut ON the drawn line. Press seams open or toward the background fabric to create (2) scrapified Fabric A Half Square Triangles. Trim to the size listed in the table below.

3. Repeat Steps 1 and 2 for the remaining scrapified fabric B, C, D, E, and F squares. You should end up with two scrapified half square triangles (HSTs) for each colorway.
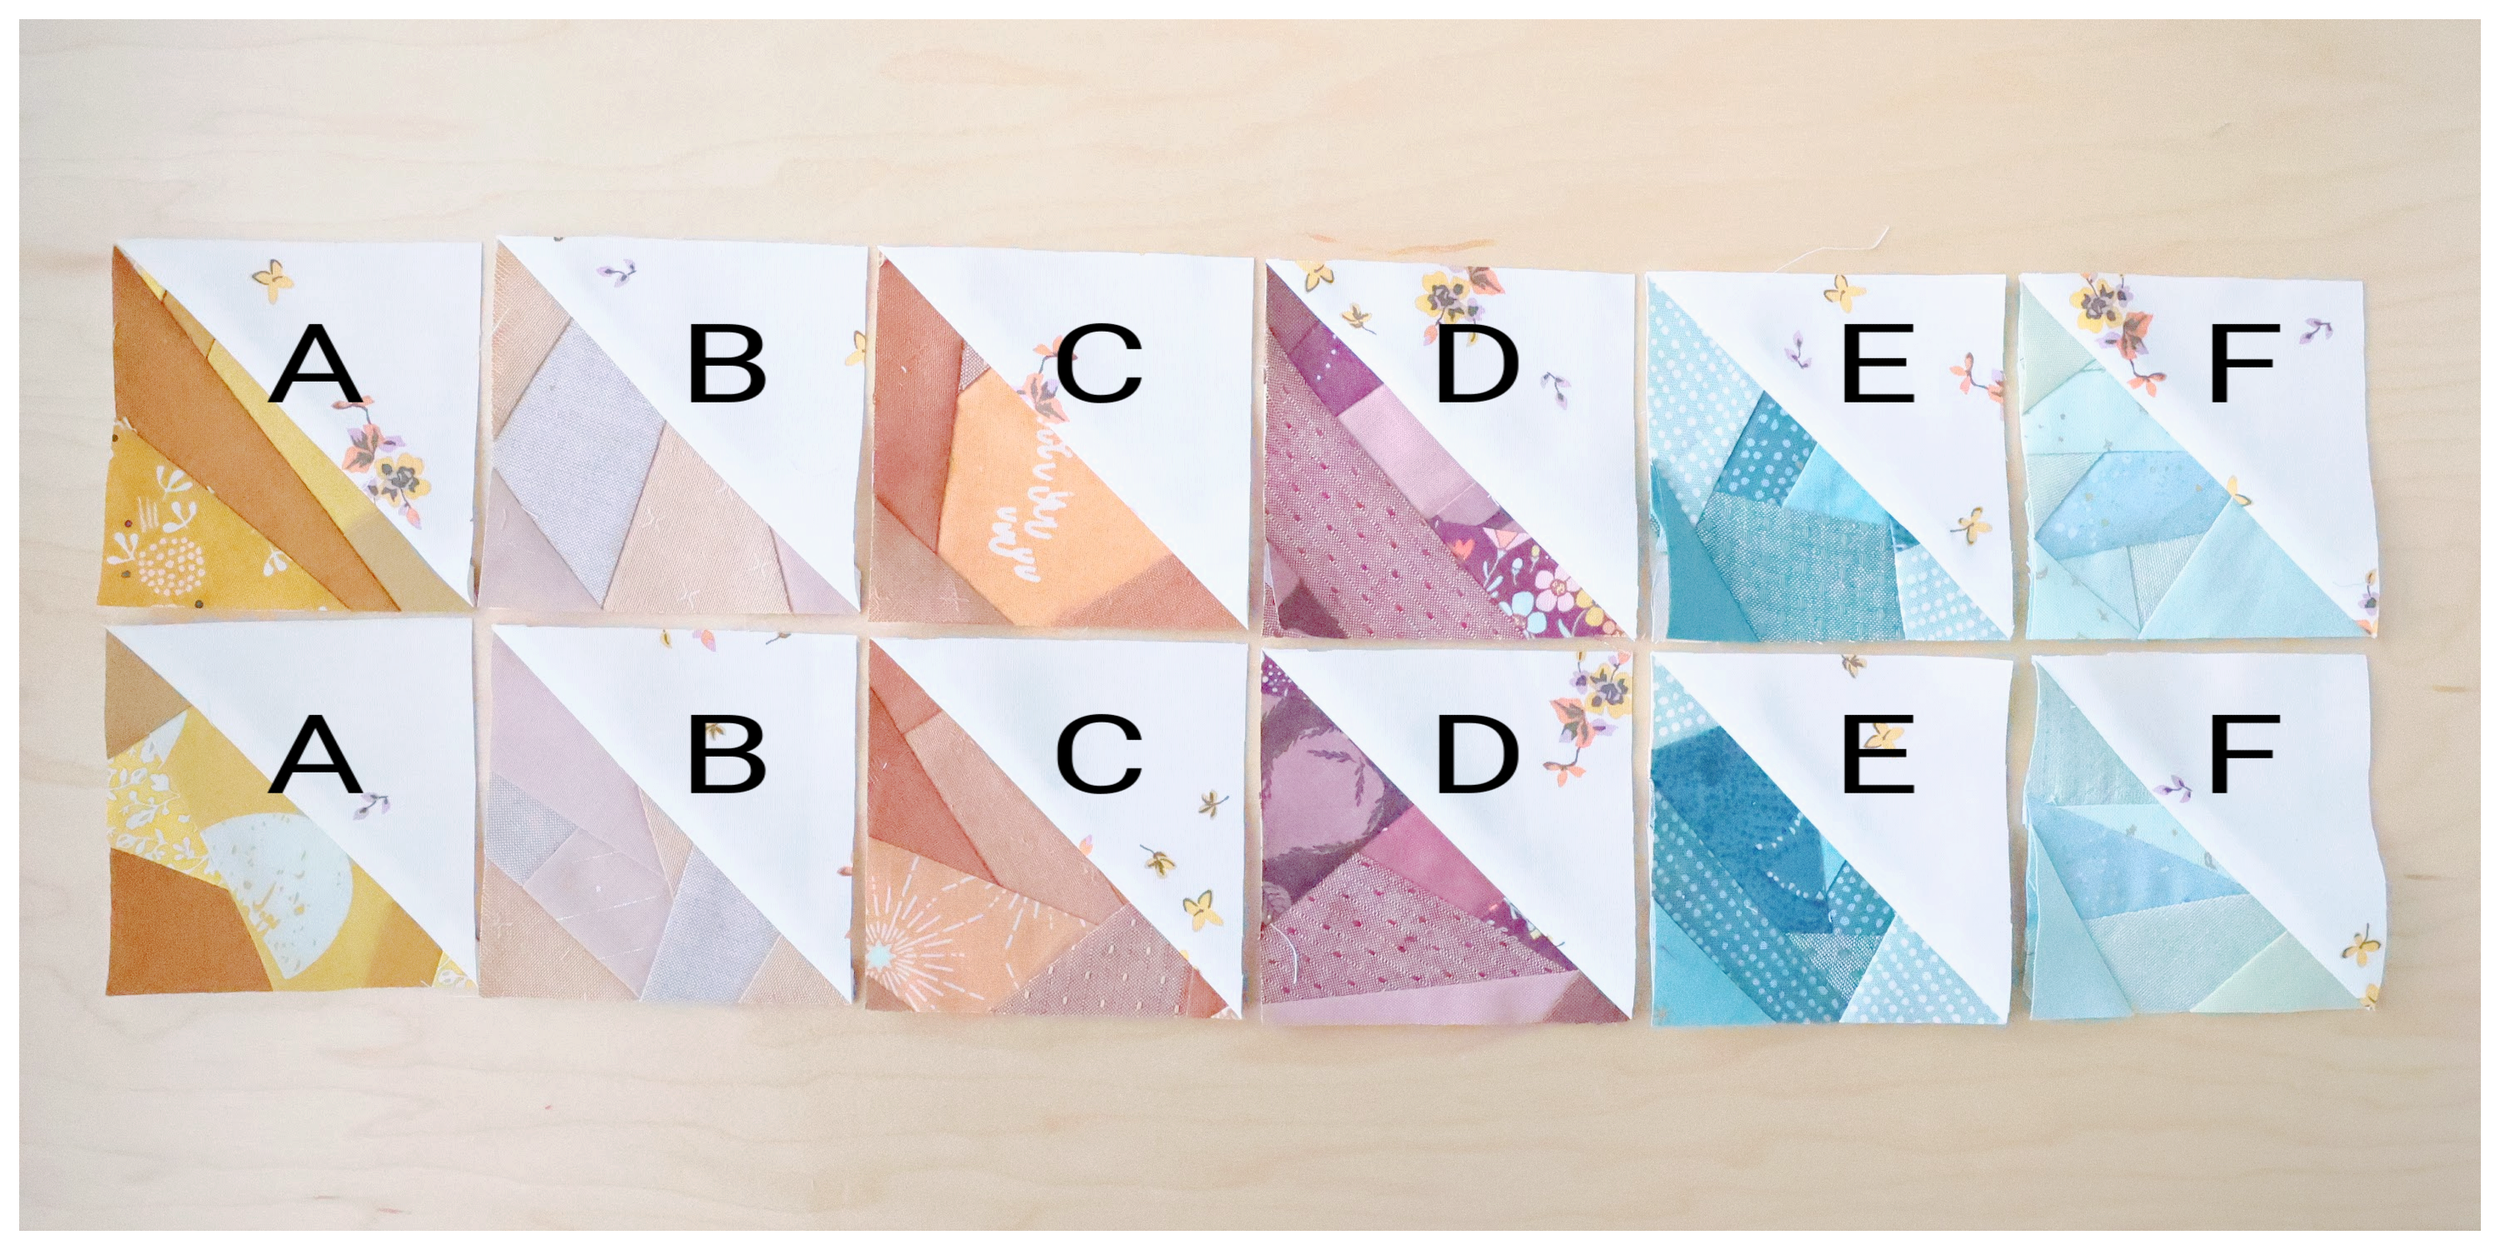
4. Arrange the (4) BG2 squares and the A-F HSTs as shown below. First, sew the pieces into rows, pressing seams open or in the same direction (alternate directions for each row). Then sew the rows together and press seams open. A tailor’s clapper can be used to help bulky seams become more flat.

Final Thoughts
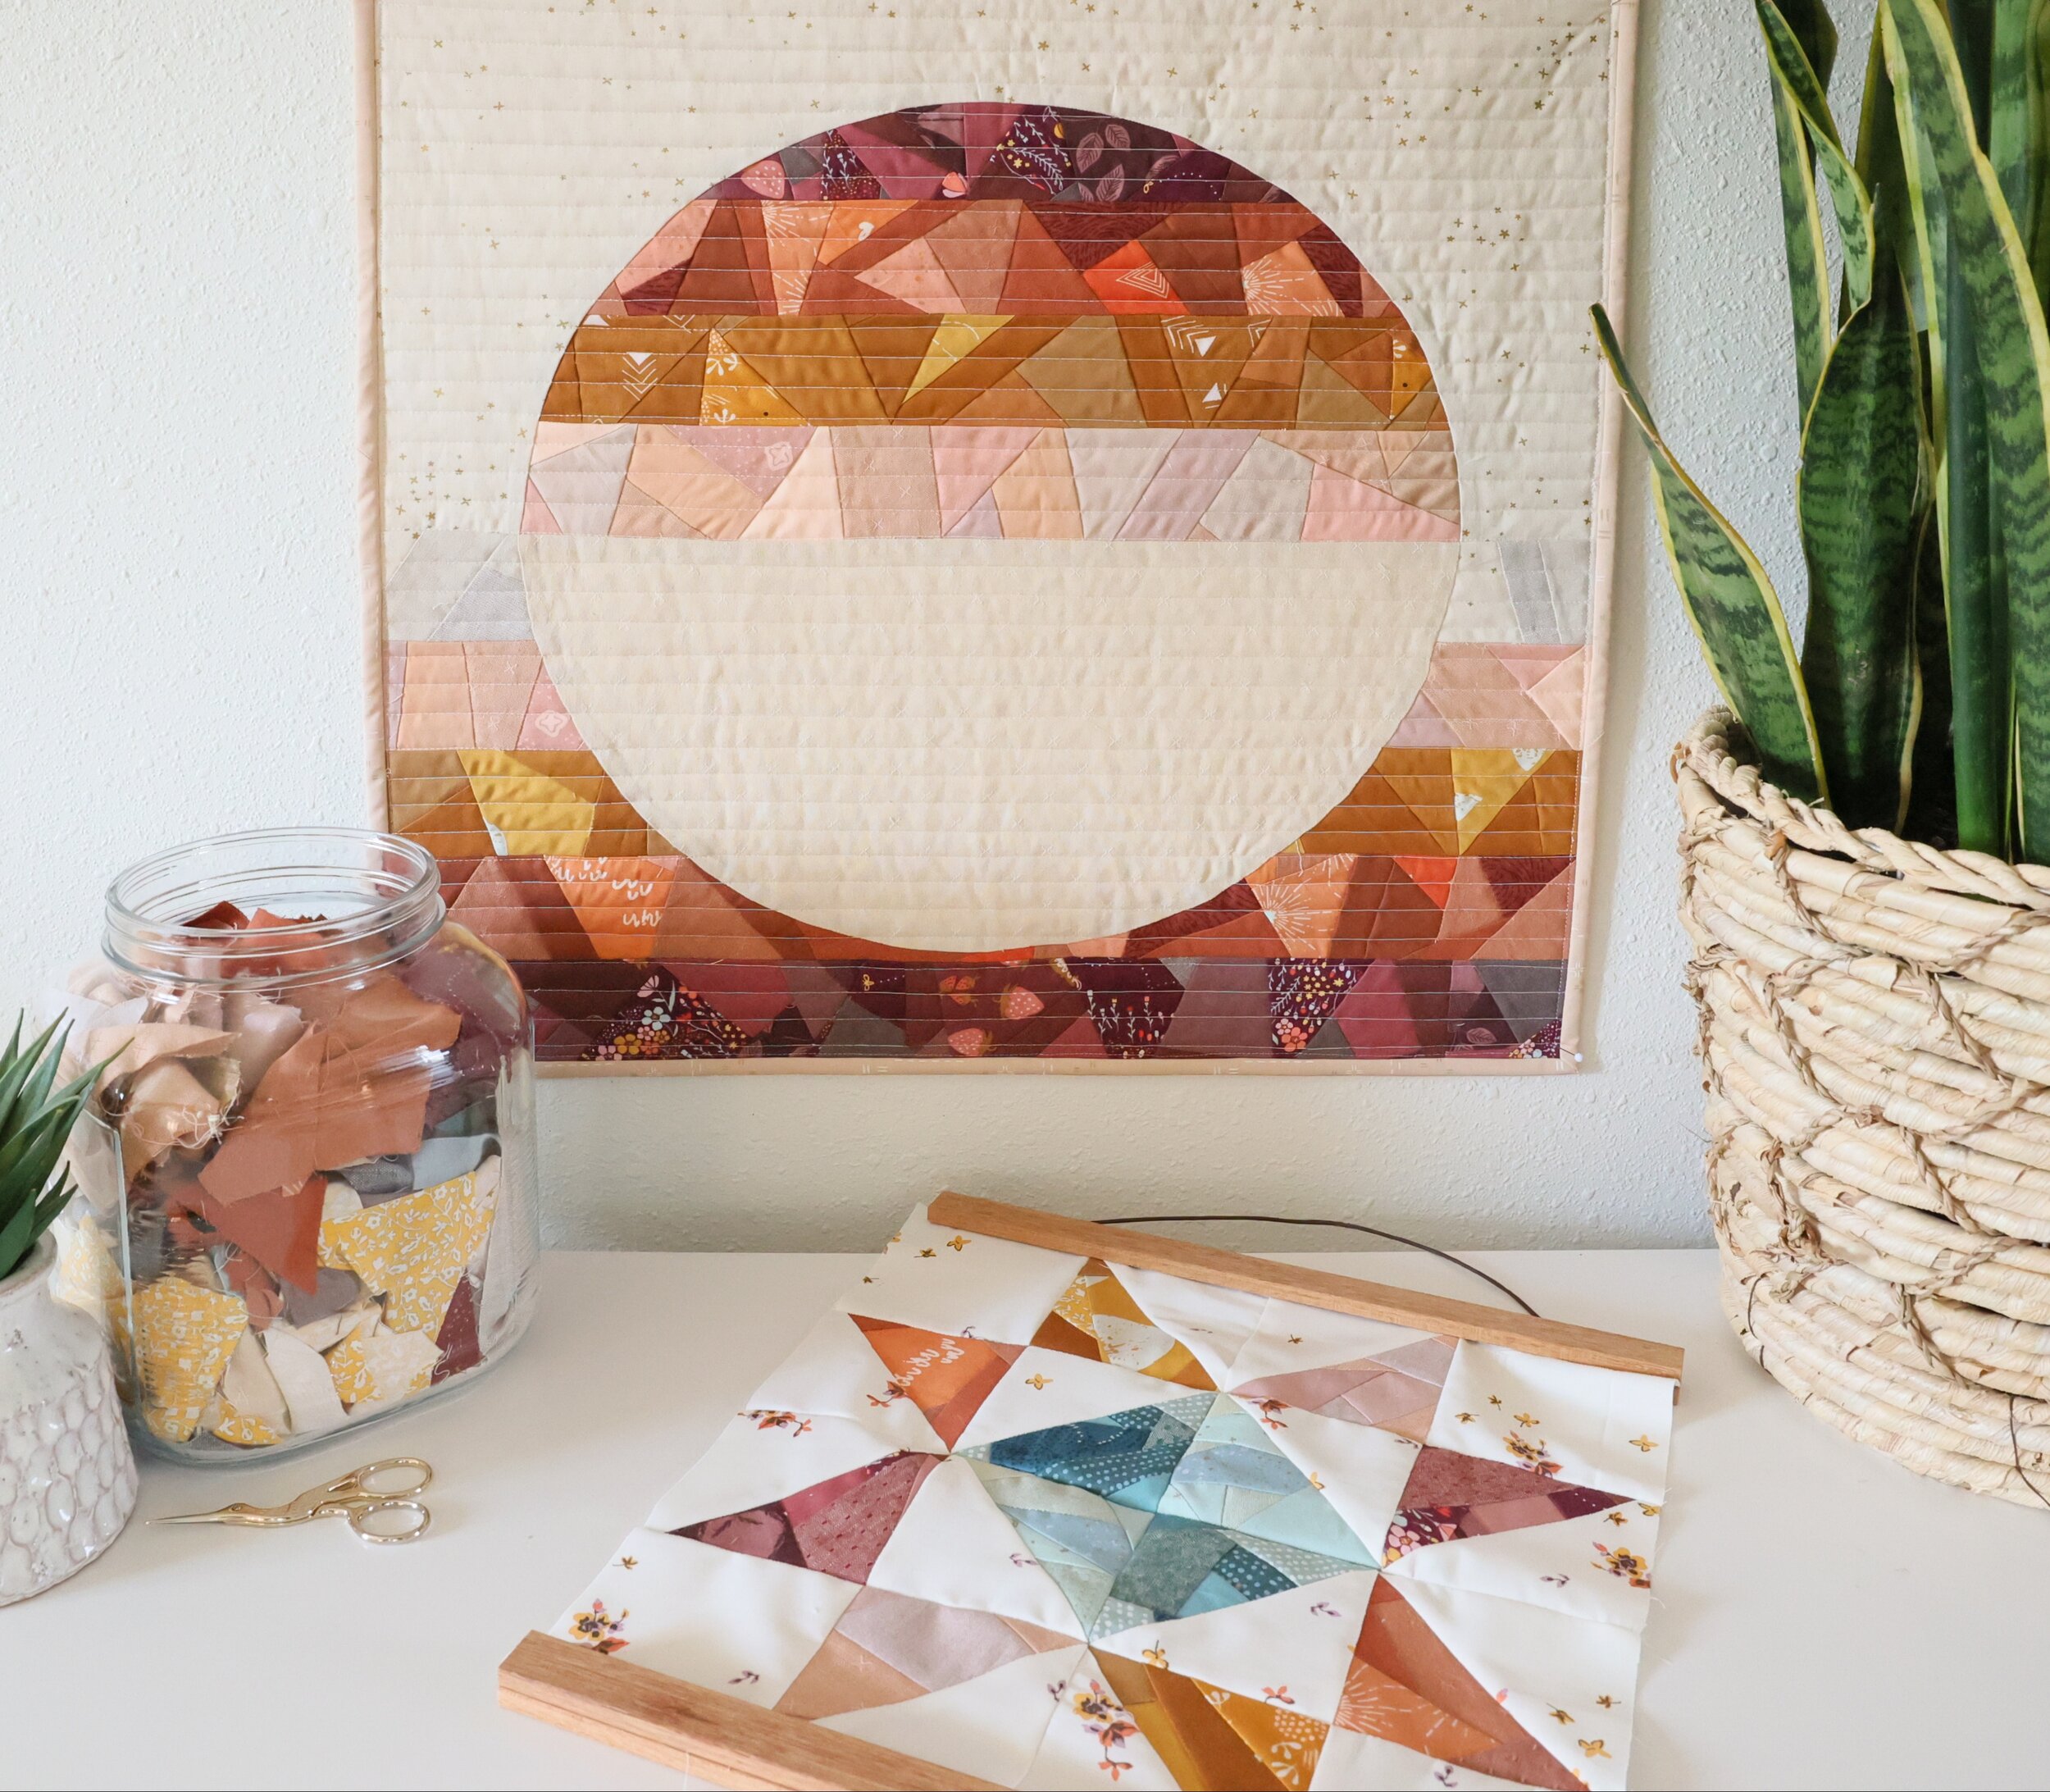
If you’ve read this far, thank you! I’ve loved sharing one of my favorite quilty techniques with you. Remember, you can use this technique for scrapifying any quilt pattern! I made a scrapified version of the Sunrise pattern from the Modern Heirloom Quilting book by Amber of Alderwood Studio and just love how it turned out!

I hope you’ve been able to find some inspiration for using up some of your scrap fabric stash in a new way. Scrapifying your scrap fabrics lets you give new life to those oddly shaped little scrap pieces that may have remained in the depths of your stash bin for a while, save a little moolah by using what you already have, and be environmentally friendly. Go you!